Gray Balancer |
 Ceska verze Ceska verze |
Gray Balancer is a free, Windows-based program for neutralization gray color. When gray is made really neutral, the remaining colors are closer to original. Program generates file with several gray patches. The file must be printed on a photo printer or via digital lab. Then, the image is photographed and GrayBalancer is used to remove any color cast. The color transformation can be either directly used to correct several images or it can be saved as .AMP file that is used by Adobe PhotoShop in "curves".
Download Gray Balancer 1.21
Main dialog
Gray Balancer user interface consists of a main dialog and several helper windows. The windows can be freely moved on desktop. Image preview window can be also resized. The position and size of all windows is saved to configuration file and reloaded next time GrayBalancer is started.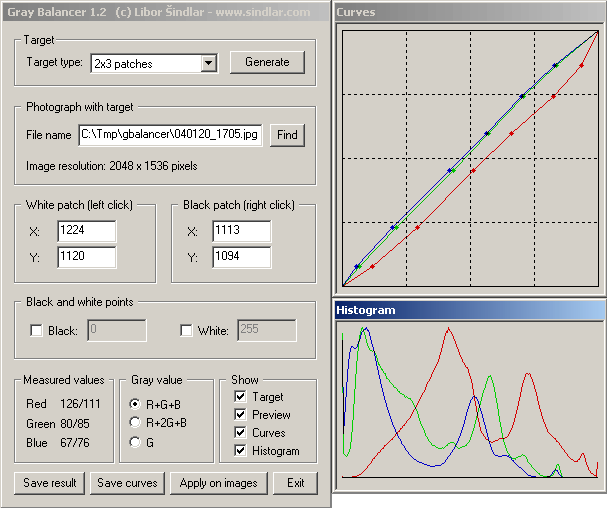
Target
This group is used to generate files with gray targets. It is possible to generate two kinds of target: 2*3 and 1*9 patches. The files must be later printed on a photo printer or exposed via digital lab. It is important to achieve as good color neutrality as possible. Therefore, it is better to use only black ink and don't print the target with color inks. To minimize reflections, matte paper is recommended. It is not important to get the exact gray values - the printed image can be both darker or lighter without any significant degradation of the result. Only color neutrality is important.
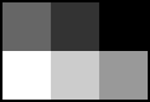 target 2x3 |
 target 1x9 |
Photograph with target
This part of the main dialog is used to select the file with photo containing the gray target. It is either possible to directly write the full path or to locate the file in browser. Thanks to use of CxImage library, GrayBalancer can work with all basic image formats: JPEG, TIFF, BMP, PNG and TGA. The images must be in TrueColor (24 or 32 bits per pixel). EXIF and color profiles are not supported. The preview windows support basic operation like zoom in/out (+/- on numeric keyboard), scrolling (cursor keys), zoom to fit (End) and Zoom 1:1 (Home).White/Black patch
The program does not know how to find the gray target on a photograph. Therefore, user must click on the white and black patches in preview window. First, the type of the target on photograph must be selected in "Target" group. Then, left mouse click will select the white patch and right click will select the black one. After both points are entered, the target is displayed in preview window. Only the displayed squares are used during computation. All computations are performed after mouse button is released. Therefore, it is possible to press the button, move mouse pointer until all patches are positioned correctly and then finally release the button.Black/White points
Gray Balancer can not only neutralize gray color but it cal also change overall contrast. By default, this feature is turned off. Usually, when you take a photo of the gray target, the black patch is not really black (RGB=0) and the white is not 100% white (RGB=255). Typical range is something like 20..230. When you want to move the black/white point to another value, just specify the new value. By specifying bigger range (say 10..240), the overall contrast is increased. When smaller range is used (like 50..200) the contrast of the image is decreased.Measured values
RGB values from the image at the position of mouse pointer are displayed here. Two numbers are displayed for each channel. The first number is the original value, the second number is the value after transformation.Gray value
RGB values from the image must be somehow transformed into gray level. GrayBalancer supports three different ways how to perform this task: First, Gray can be computed as average of Red, Green and Blue. Second, Average with Green taken twice (most of digital cameras have single Red and Blue and two Green sensors and Green channel is therefore less sensitive to noise). The last possibility is to take directly the Green channel. In the reality, the differences between all these options are not big and the default R+2G+B mode will be sufficient in most cases.Show
This part of the dialog controls what exactly is displayed. Toggles in this group have no influence on the result but they may help with visualization of the whole process.Target - show the squares that are used for computation. This way, it is easy to check if black and white points were entered correctly and fix any possible inaccuracy.
Preview - when the toggle is checked, the image preview show the final result after gray balancing. Otherwise, the preview always show the original image. As gray balancing takes some time, it may be useful to turn this option off during black/white point selection. When the black/white patches are correctly selected, the option can be again turned on.
Curves - show the window actually describing the gray balancing transformation. The horizontal axis show input values 0..255. The vertical axis show the output values. Individual channels are displayed with corresponding color. Measured values are highlighted.
Histogram - show window with histogram of the original or final image. The horizontal axis show values 0..255 and vertical axis display frequency of each values. To see histogram of the final image, push and hold left mouse button in the histogram window. Note that histogram of the final image is usually not smooth.
Save result
Save the current result to disk. To protect the original file, an appendix "_out" is added at the end of file name. However, both file name and file type can be freely modified.Save curves
Save the transformation to disk. It is possible to save either just the measured values into a text file or the complete transformation can be saved into .AMP file and used later in PhotoShop Curves tool.Apply on images
Perform the gray balancing on a several files. The files can be in JPEG, TIFF, PNG, BMP or TGA format with 24 or 32 bits per pixel. Old files are replaced by new versions without any prompt. Warning: to get good result, all images must be shot at exactly same conditions!The newly created images don't have any EXIF info or color profile. To preserve existing EXIF info, backup it before balancing gray value and restore it afterwards. The backup and restore tasks can be done for example in Zoner Media Explorer.
Example of gray balancing
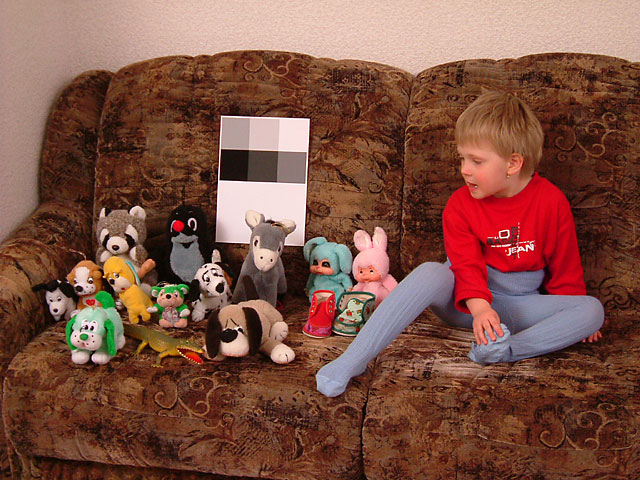 Original image |
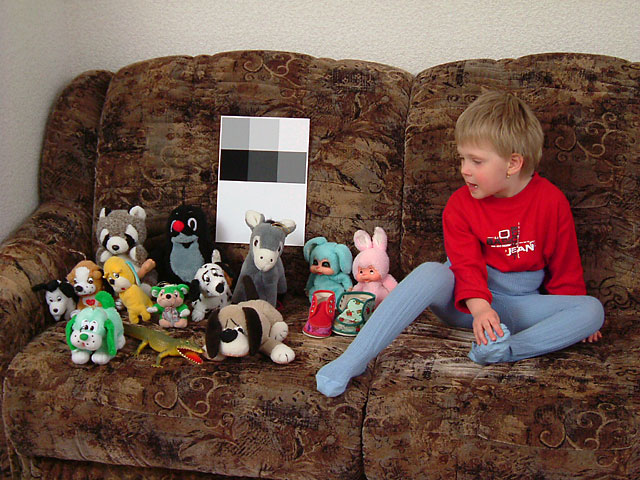 Result |
Download
Program GrayBalancer is freeware (free for any commercial and non-commercial usage). It was tested only with Windows 2000 but anything better than Windows 98 should be enough to run. The program does not need any installation - just copy all the files into a directory and run gbalancer.exeDownload GrayBalancer 1.21 build 30-Mar-2004: GBalancer121.zip
(c) Libor Šindlar, 1.2.2004 Back